Protect D2iQ clusters with KubeArmor Protection
This blog walks you through a step-by-step guide for Enhanced KubeArmor integration in the D2iQ Kubernetes Platform. Learn how to leverage open-source security for Kubernetes deployed applications – with granular policies that control the behavior of containers to secure applications.
Reading Time: 10 minutes


Table of Contents


Kubernetes is one of the fastest-growing tools for managing and orchestrating containerized applications in today’s cloud-native environment. While these deployments are becoming very complex and mission-critical, securing them remains a challenge. Recent security incidents, such as high-profile supply chain attacks and container escape vulnerabilities, have brought to the fore the need to implement robust runtime security measures for Kubernetes environments.
These include, for example, the SolarWinds supply chain attack that hit software build systems and injected malware into thousands of customers’ updates, or the Kubernetes privilege escalation vulnerability, CVE-2020-8558, that granted unauthorized access to sensitive resources and potentially allowed container escape scenarios.
Solutions such as KubeArmor, an open-source policy enforcement engine designed to limit the behaviors of pods, containers, and nodes within Kubernetes clusters, can help address these challenges through policy-based limitations within Kubernetes clusters. Combining KubeArmor with the D2iQ Kubernetes Platform, a leading independent Kubernetes management platform, can greatly assist organizations in improving their runtime security posture and achieving greater control over their Kubernetes deployments.
In this blog post, we will look at how the D2iQ Kubernetes Platform integrates with KubeArmor for several benefits. We will guide you through the integration process, from the deployment of KubeArmor within the DKP application catalog to the seamless integration of these powerful tools with DKP-managed clusters. This blog post demonstrates how to define and apply security policies to restrict container behavior, mitigate potential threats, and stay compliant with industry standards and regulatory requirements.
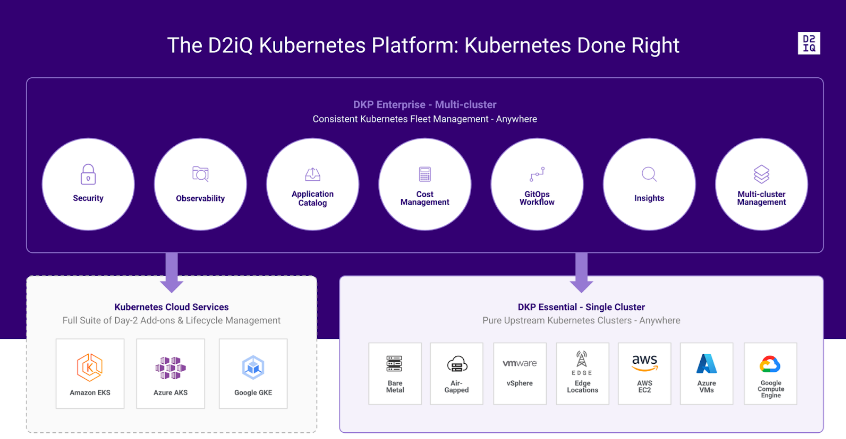
Introducing the D2iQ Kubernetes Platform (DKP)
As the leading independent Kubernetes Management Platform in production, the D2iQ Kubernetes Platform (DKP) provides a holistic approach and a complete set of enterprise-grade technologies, services, training, and support to build and run applications in production at scale. Built around the open-source Cluster API, the new version of DKP becomes the single, centralized point of control for an organization’s application infrastructure, empowering organizations to more easily deploy, manage, and scale Kubernetes workloads in Day 2 production environments.
Deploying D2iQ Kubernetes Platform on AWS Cloud
Pre-requisites:
- Latest DKP Binary
- DKP Enterprise License key
- Hands-on experience with AWS services like CloudFormation, EC2, IAM, etc.
- Follow the official documentation for DKP deployment Day 1 – Basic Installs by Infrastructur.e

Once DKP deployment is done, activate the enterprise license from the UI
DKP Application Catalog
Catalog applications are any third-party or open-source applications that appear in the Catalog. These applications are deployed to be used for customer workloads.
D2iQ provides DKP Catalog Applications for use in your environment.

We will add KubeArmor to the DKP application catalog.
Introducing KubeArmor – An Open-Source Policy Enforcement Engine
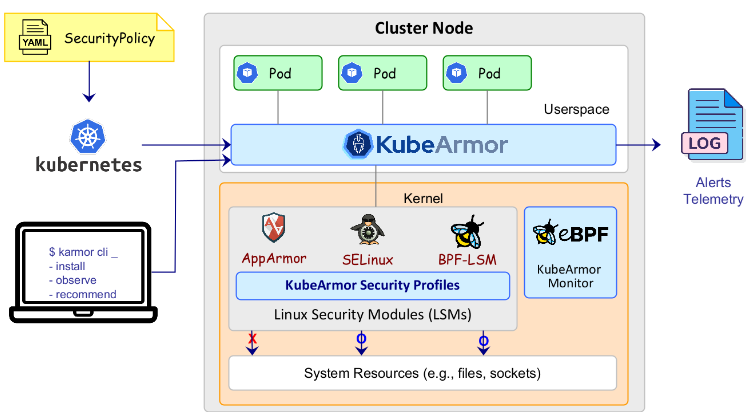
KubeArmor is a cloud-native runtime security enforcement system that restricts the behavior (such as process execution, file access, and networking operations) of pods, containers, and nodes (VMs) at the system level. It leverages Linux security modules (LSMs) such as AppArmor, SELinux, or BPF-LSM to enforce the user-specified policies. KubeArmor generates rich alerts/telemetry events with container/pod/namespace identities by leveraging eBPF.
Steps:
- Create a git-repository
- Git Repository Directory Structure
Use the following basic directory structure for your git repository:
├── helm-repositories │ ├──│ │ ├── kustomization.yaml │ │ └── .yaml │ └── │ ├── kustomization.yaml │ └── .yaml └── services ├── │ ├── # semantic version of the app helm chart. e.g., 1.2.3 │ │ ├── defaults │ │ │ ├── cm.yaml │ │ │ └── kustomization.yaml │ │ ├── .yaml │ │ └── kustomization.yaml │ ├── # another semantic version of the app helm chart. e.g., 2.3.4 │ │ ├── defaults │ │ │ ├── cm.yaml │ │ │ └── kustomization.yaml │ │ ├── .yaml │ │ └── kustomization.yaml │ └── metadata.yaml └── ...
Refer to the KubeArmor Git repository for the DKP Catalog
Note: Please remember to fill out the metadata.yaml with the application details that will be visible on the UI.
Enable KubeArmor from the Workspace Catalog
Prerequisites
- Determine the name of the workspace where you wish to perform the deployments. You can use the dkp get workspaces command to see the list of workspace names and their corresponding namespaces.
- Set the WORKSPACE_NAMESPACE environment variable to the name of the workspace’s namespace where the cluster is attached:
export WORKSPACE_NAMESPACE= Steps:
- Get the list of available applications to enable using the following command:
kubectl get apps -n kommander
kubectl get apps -n kommander --kubeconfig cluster.conf
NAME                  APP ID          APP VERSION   AGE
elasticsearch-2.0.0   elasticsearch   2.0.0         3d22h
gitlab-5.7.0          gitlab          5.7.0         3d22h
keycloak-15.1.0       keycloak        15.1.0        3d22h
kubearmor-1.3.2       kubearmor       1.3.2         3d22h
linkerd-2.13.4        linkerd         2.13.4        3d22h
linkerd-2.13.5        linkerd         2.13.5        3d22h
weave-gitops-0.11.0   weave-gitops    0.11.0        3d22h
weave-gitops-0.12.0   weave-gitops    0.12.0        3d22h
weave-gitops-0.18.0   weave-gitops    0.18.0        3d22h
weave-gitops-0.32.0   weave-gitops    0.32.0        3d22h
- Deploy KubeArmor from the list with an AppDeployment resource.
- Within the AppDeployment, define the appRef to specify which App will be enabled:
cat <<EOF | kubectl apply -f -
apiVersion: apps.kommander.d2iq.io/v1alpha3
kind: AppDeployment
metadata:
  name: my-custom-app
  namespace: ${WORKSPACE_NAMESPACE}    //kommander
spec:
  appRef:
    name: kubearmor-1.3.2
    kind: App
EOF
Verify Applications
After completing the previous steps, your applications are enabled. Connect to the attached cluster and check the HelmReleases to verify the deployments:
kubectl get helmreleases -n kommander
Output:
kubectl get helmreleases -n kommander --kubeconfig cluster.conf
NAME                            AGE     READY   STATUS
ai-navigator-cluster-info-api   8d      True    Release reconciliation succeeded
centralized-grafana             8d      True    Release reconciliation succeeded
centralized-kubecost            8d      True    Release reconciliation succeeded
cluster-observer-2360587938     8d      True    Release reconciliation succeeded
dex                             8d      True    Release reconciliation succeeded
dex-k8s-authenticator           8d      True    Release reconciliation succeeded
dkp-insights-management         8d      True    Release reconciliation succeeded
gatekeeper                      8d      True    Release reconciliation succeeded
gatekeeper-proxy-mutations      8d      True    Release reconciliation succeeded
gitea                           8d      True    Release reconciliation succeeded
grafana-logging                 8d      True    Release reconciliation succeeded
grafana-loki                    8d      True    Release reconciliation succeeded
karma                           8d      True    Release reconciliation succeeded
karma-traefik                   8d      True    Release reconciliation succeeded
karma-traefik-certs             8d      True    Release reconciliation succeeded
kommander                       8d      True    Release reconciliation succeeded
kommander-appmanagement         8d      True    Release reconciliation succeeded
kommander-operator              8d      True    Release reconciliation succeeded
kommander-ui                    8d      True    Release reconciliation succeeded
kube-oidc-proxy                 8d      True    Release reconciliation succeeded
kube-prometheus-stack           8d      True    Release reconciliation succeeded
kubearmor-operator              3d23h   True    Release reconciliation succeeded
kubecost                        8d      True    Release reconciliation succeeded
kubecost-thanos-traefik         8d      True    Release reconciliation succeeded
kubecost-traefik-certs          8d      True    Release reconciliation succeeded
kubefed                         8d      True    Release reconciliation succeeded
kubernetes-dashboard            8d      True    Release reconciliation succeeded
kubetunnel                      8d      True    Release reconciliation succeeded
logging-operator                8d      True    Release reconciliation succeeded
logging-operator-logging        8d      True    Release reconciliation succeeded
object-bucket-claims            8d      True    Release reconciliation succeeded
prometheus-adapter              8d      True    Release reconciliation succeeded
prometheus-thanos-traefik       8d      True    Release reconciliation succeeded
prometheus-traefik-certs        8d      True    Release reconciliation succeeded
reloader                        8d      True    Release reconciliation succeeded
rook-ceph                       8d      True    Release reconciliation succeeded
rook-ceph-cluster               8d      True    Release reconciliation succeeded
thanos                          8d      True    Release reconciliation succeeded
traefik                         8d      True    Release reconciliation succeeded
traefik-forward-auth-mgmt       8d      True    Release reconciliation succeeded
velero                          8d      True    Release reconciliation succeeded
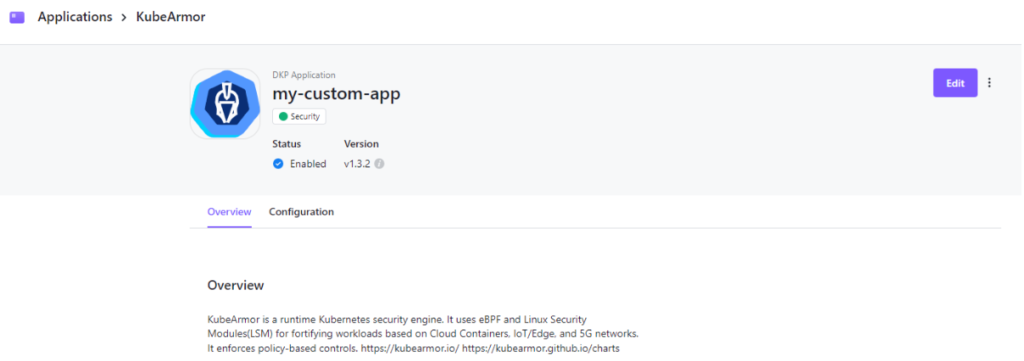
Verify from the UI
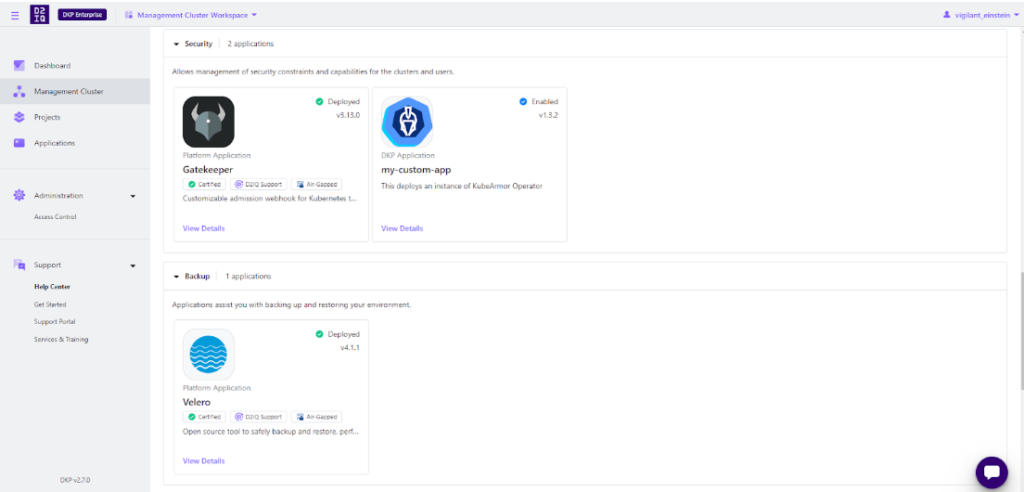
Check the status of Kubearmor pods
kubectl get po -A -n kommander
kubectl get po -A -n kommander --kubeconfig cluster.conf

All the pods are running, now we can enforce KubeArmor on a sample application
Applying KubeArmor Policy
The user needs to go to the Cluster to apply the following KubeArmor policy.
apiVersion: security.kubearmor.com/v1
kind: KubeArmorPolicy
metadata:
  name: harden-mysql-pkg-mngr-exec
  namespace: wordpress-mysql
spec:
  action: Block
  message: Alert! Execution of package management process inside container is denied
  process:
    matchPaths:
    - path: /usr/bin/apt
    - path: /usr/bin/apt-get
    - path: /bin/apt-get
    - path: /sbin/apk
    - path: /bin/apt
    - path: /usr/bin/dpkg
    - path: /bin/dpkg
    - path: /usr/bin/gdebi
    - path: /bin/gdebi
    - path: /usr/bin/make
    - path: /bin/make
    - path: /usr/bin/yum
    - path: /bin/yum
    - path: /usr/bin/rpm
    - path: /bin/rpm
    - path: /usr/bin/dnf
    - path: /bin/dnf
    - path: /usr/bin/pacman
    - path: /usr/sbin/pacman
    - path: /bin/pacman
    - path: /sbin/pacman
    - path: /usr/bin/makepkg
    - path: /usr/sbin/makepkg
    - path: /bin/makepkg
    - path: /sbin/makepkg
    - path: /usr/bin/yaourt
    - path: /usr/sbin/yaourt
    - path: /bin/yaourt
    - path: /sbin/yaourt
    - path: /usr/bin/zypper
    - path: /bin/zypper
  selector:
    matchLabels:
      app: mysql
  severity: 5
  tags:
  - NIST
  - NIST_800-53_CM-7(4)
  - SI-4
  - process
  - NIST_800-53_SI-4
Save the policy as a “.yaml” file.
Applying the policy from the cluster:
kubectl apply -f mysql.yaml -n wordpress-mysql --kubeconfig cluster.conf
kubearmorpolicy.security.kubearmor.com/harden-mysql-pkg-mngr-exec created
Violating the Policy
To violate the Above policy, users need to exec into the MySQL pod under the WordPress-MySQL namespace.
kubectl exec -it mysql-74775b4bf4-mfdcr -n wordpress-mysql --kubeconfig cluster.conf -- bash
root@mysql-74775b4bf4-mfdcr:/# apt-get update
bash: /usr/bin/apt-get: Permission denied
root@mysql-74775b4bf4-mfdcr:/# apt upgrade
bash: /usr/bin/apt: Permission denied

Policy logs
To see the Policy Logs, the users must navigate to the Cluster CLI and give the following command,d and then view the policy from the MySQL pod
karmor logs
Sample Output:
karmor logs --kubeconfig cluster.conf
local port to be used for port forwarding kubearmor-relay-599df6f667-pzjqk: 32890
Created a gRPC client (localhost:32890)
Checked the liveness of the gRPC server
Started to watch alerts
== Alert / 2024-04-01 11:12:56.921907 ==
ClusterName: default
HostName: ip-10-0-122-67
NamespaceName: wordpress-mysql
PodName: mysql-74775b4bf4-mfdcr
Labels: app=mysql
ContainerName: mysql
ContainerID: befbef6b9371eac5d3966f40f87593829e6f1a820f2454bbd13e656f0b5bbdab
ContainerImage: docker.io/library/mysql:5.6@sha256:20575ecebe6216036d25dab5903808211f1e9ba63dc7825ac20cb975e34cfcae
Type: MatchedPolicy
PolicyName: harden-mysql-pkg-mngr-exec
Severity: 5
Message: Alert! Execution of package management process inside container is denied
Source: /bin/bash
Resource: /usr/bin/apt-get update
Operation: Process
Action: Block
Data: syscall=SYS_EXECVE
Enforcer: AppArmor
Result: Permission denied
ATags: [NIST NIST_800-53_CM-7(4) SI-4 process NIST_800-53_SI-4]
Cwd: /
HostPID: 770816
HostPPID: 270053
Owner: map[Name:mysql Namespace:wordpress-mysql Ref:Deployment]
PID: 196
PPID: 188
ParentProcessName: /bin/bash
ProcessName: /usr/bin/apt-get
TTY: pts0
Tags: NIST,NIST_800-53_CM-7(4),SI-4,process,NIST_800-53_SI-4
UID: 0
Testing the Integration on User-attached EKS cluster
Before you begin
This procedure requires the following items and configurations:
- A fully configured and running Amazon EKS cluster with administrative privileges.
- The current version of DKP Enterprise is installed on your cluster.
- Ensure you have installed kubectl in your Management cluster.
Attach Amazon EKS Clusters
Ensure that the KUBECONFIG environment variable is set to the Management cluster before attaching by running:
export KUBECONFIG=<Management_cluster_kubeconfig>.conf
Access your EKS clusters
Ensure you are connected to your EKS clusters. Enter the following commands for each of your clusters:
kubectl config get-contexts
kubectl config use-context <context for first eks cluster>
Confirm kubectl can access the EKS cluster:
kubectl get nodes

Create a kubeconfig File for your EKS cluster
To get started, ensure you have kubectl set up and configured with ClusterAdmin for the cluster you want to connect to Kommander.
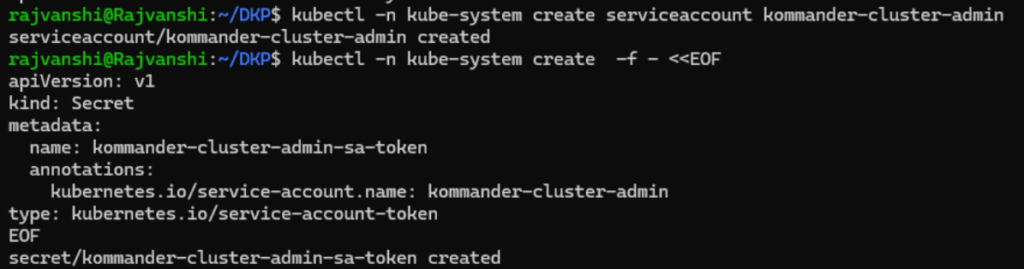
Create the necessary service account:
kubectl -n kube-system create serviceaccount kommander-cluster-admin
Create a token secret for the serviceaccount:
kubectl -n kube-system create  -f - <<EOF
apiVersion: v1
kind: Secret
metadata:
  name: kommander-cluster-admin-sa-token
  annotations:
    kubernetes.io/service-account.name: kommander-cluster-admin
type: kubernetes.io/service-account-token
EOF
For more information on Service Account Tokens, refer to this article.
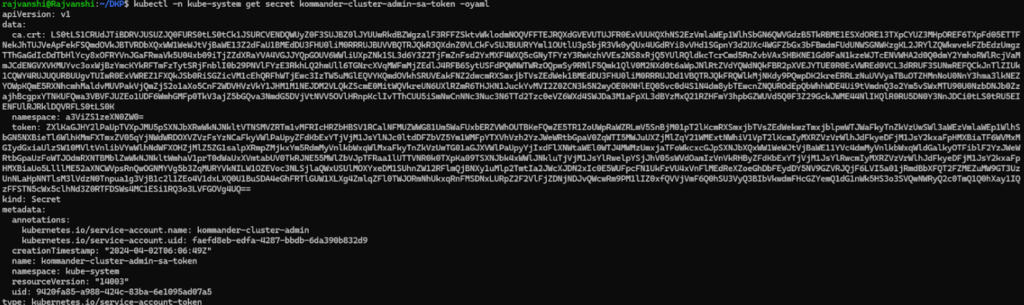
Verify that the serviceaccount token is ready by running this command:
kubectl -n kube-system get secret kommander-cluster-admin-sa-token -oyaml
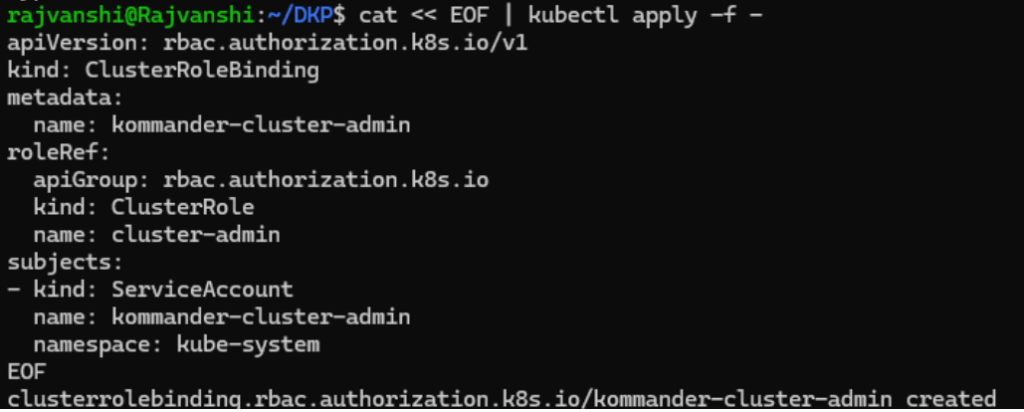
Configure the new service account for cluster-admin permissions:
cat << EOF | kubectl apply -f -
apiVersion: rbac.authorization.k8s.io/v1
kind: ClusterRoleBinding
metadata:
  name: kommander-cluster-admin
roleRef:
  apiGroup: rbac.authorization.k8s.io
  kind: ClusterRole
  name: cluster-admin
subjects:
- kind: ServiceAccount
  name: kommander-cluster-admin
  namespace: kube-system
EOF
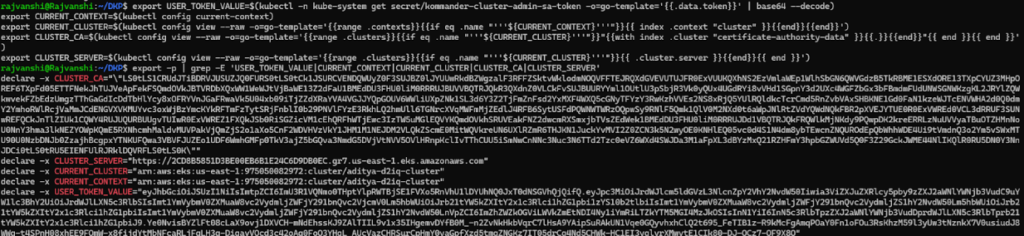
Set up the following environment variables with the access data that is needed for producing a new kubeconfig file:
export USER_TOKEN_VALUE=$(kubectl -n kube-system get secret/kommander-cluster-admin-sa-token -o=go-template='{{.data.token}}' | base64 --decode)
export CURRENT_CONTEXT=$(kubectl config current-context)
export CURRENT_CLUSTER=$(kubectl config view --raw -o=go-template='{{range .contexts}}{{if eq .name "'''${CURRENT_CONTEXT}'''"}}{{ index .context "cluster" }}{{end}}{{end}}')
export CLUSTER_CA=$(kubectl config view --raw -o=go-template='{{range .clusters}}{{if eq .name "'''${CURRENT_CLUSTER}'''"}}"{{with index .cluster "certificate-authority-data" }}{{.}}{{end}}"{{ end }}{{ end }}')
export CLUSTER_SERVER=$(kubectl config view --raw -o=go-template='{{range .clusters}}{{if eq .name "'''${CURRENT_CLUSTER}'''"}}{{ .cluster.server }}{{end}}{{ end }}')
Confirm these variables have been set correctly:
export -p | grep -E 'USER_TOKEN_VALUE|CURRENT_CONTEXT|CURRENT_CLUSTER|CLUST
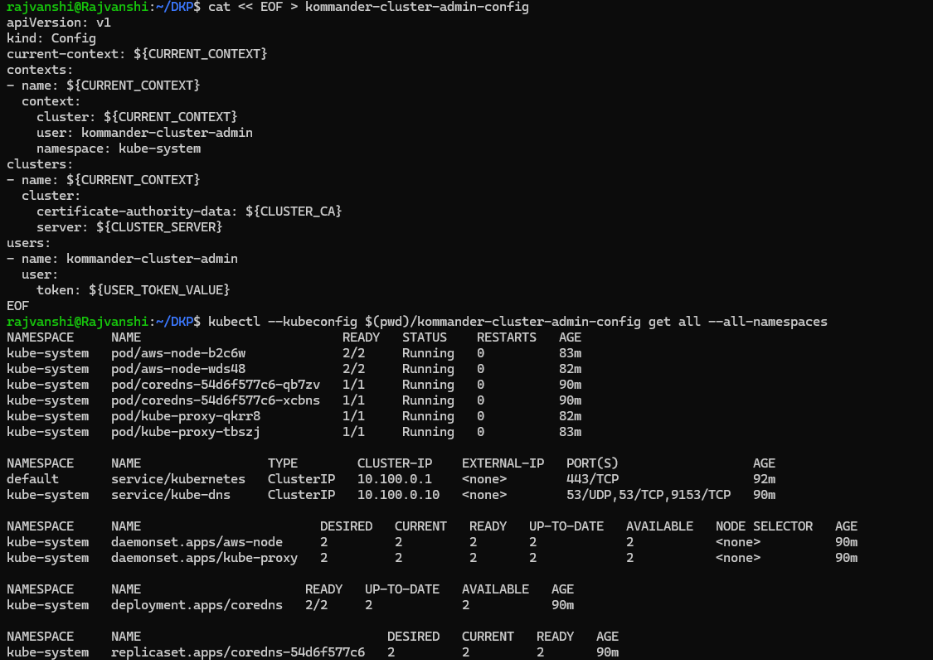
Generate a kubeconfig file that uses the environment variable values from the previous step:
cat << EOF > kommander-cluster-admin-config
apiVersion: v1
kind: Config
current-context: ${CURRENT_CONTEXT}
contexts:
- name: ${CURRENT_CONTEXT}
  context:
    cluster: ${CURRENT_CONTEXT}
    user: kommander-cluster-admin
    namespace: kube-system
clusters:
- name: ${CURRENT_CONTEXT}
  cluster:
    certificate-authority-data: ${CLUSTER_CA}
    server: ${CLUSTER_SERVER}
users:
- name: kommander-cluster-admin
  user:
    token: ${USER_TOKEN_VALUE}
EOF
This process produces a file in your current working directory called kommander-cluster-admin-config. The contents of this file are used in Kommander to attach the cluster.
Before importing this configuration, verify that the kubeconfig file can access the cluster:
kubectl --kubeconfig $(pwd)/kommander-cluster-admin-config get all --all-namespaces
Finalize the Attachment of your Cluster from the UI
Now that you have kubeconfig, go to the DKP UI and follow the steps below:
1. From the top menu bar, select your target workspace.

2. On the Dashboard page, select the Add Cluster option in the Actions dropdown menu at the top right.
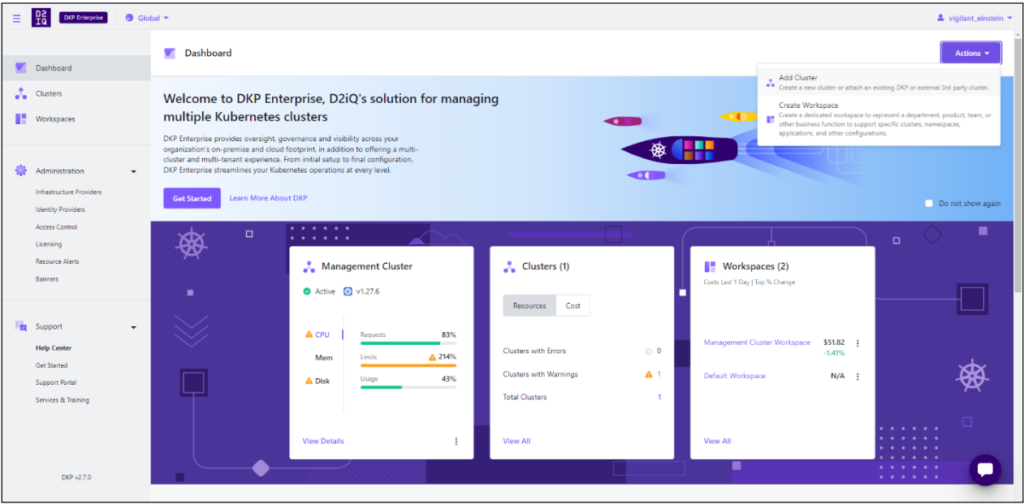
3.Select Attach Cluster.
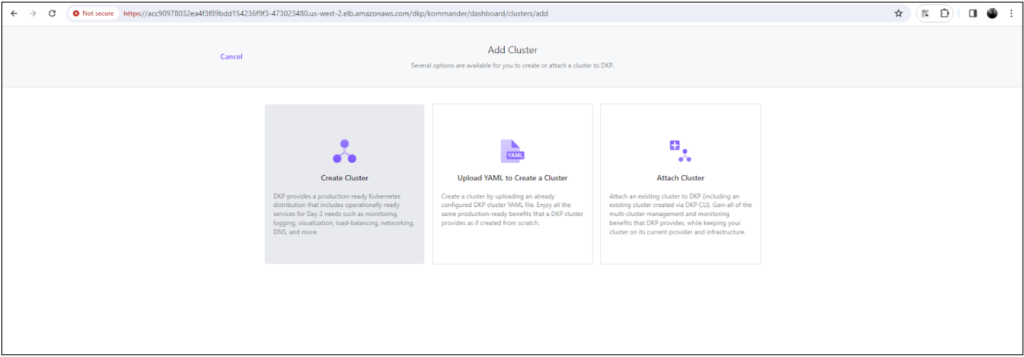
4. Select the No additional networking restrictions card. Alternatively, if you must use network restrictions, stop following the steps below, and see the instructions on the page Attach a cluster WITH network restrictions.
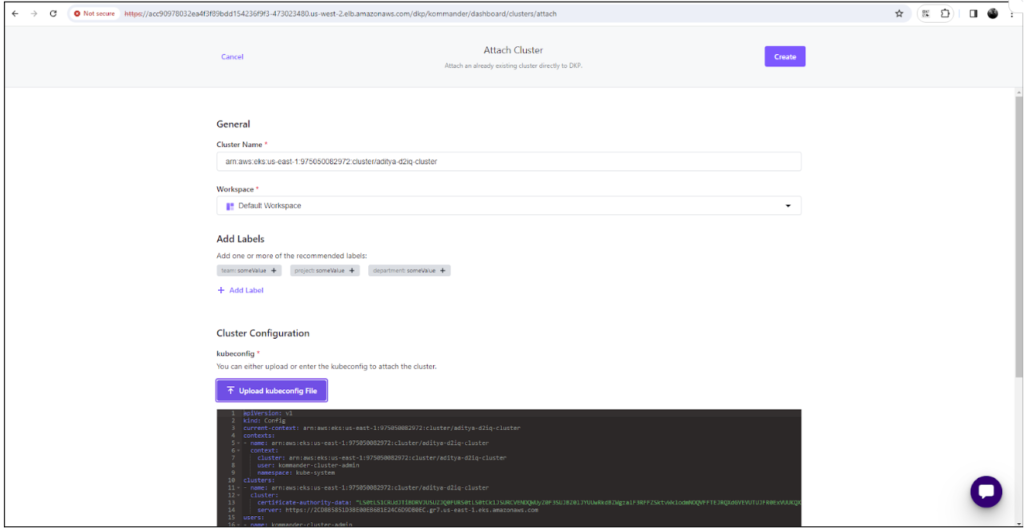
5. Upload the kubeconfig file you created in the previous section (or copy its contents) into the Cluster Configuration section.
6 . The Cluster Name field automatically populates with the name of the cluster in the kubeconfig. You can edit this field with the name you want for your cluster.
Open image-20240402-064512.png
7. Add labels to classify your cluster as needed.
8. Select Create to attach your cluster.


The cluster is connected successfully.
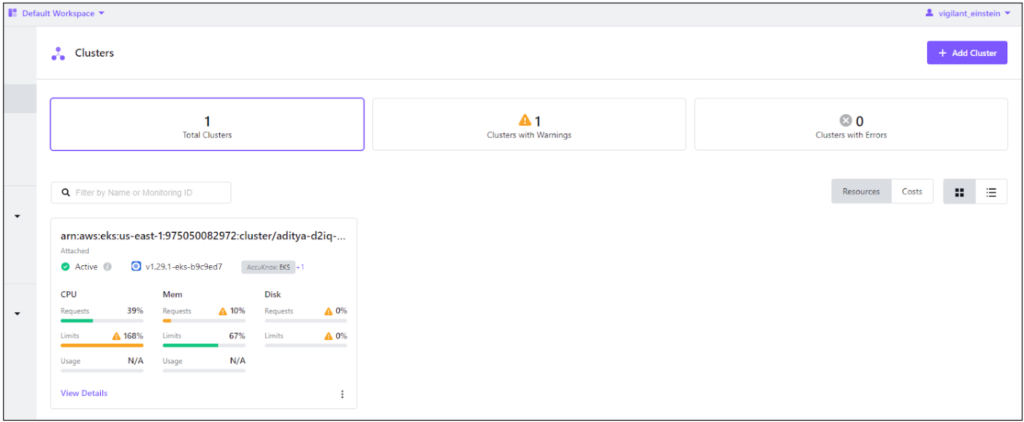
Click on View Details
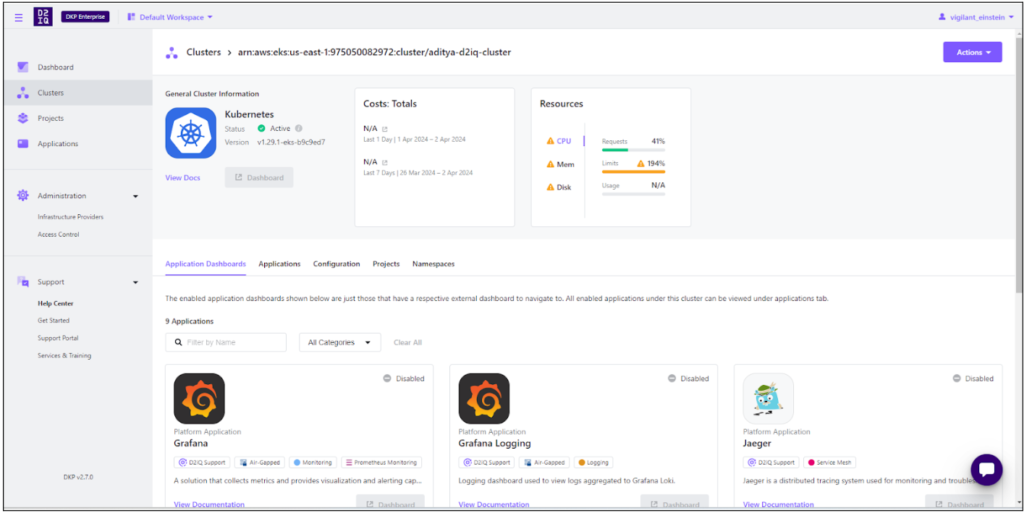
Installing KubeArmor
Follow the same steps that we followed while deploying KubeArmor in the management cluster.
- Create a Git repository
- Deploy KubeArmor from the apps list with an AppDeployment resource.
- Verify the deployment from the UI
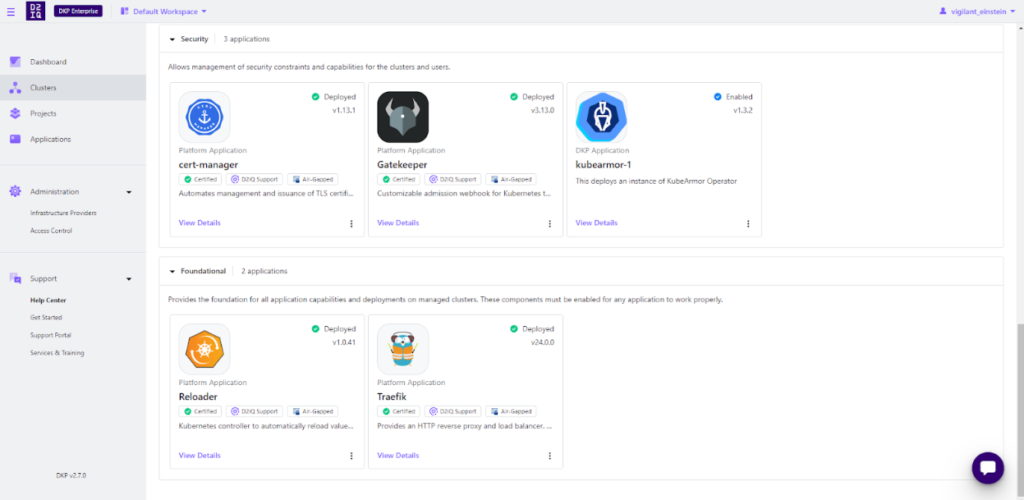
KubeArmor is enabled under the Default Workspace in the attached EKS cluster, and all the pods are running.

Applying KubeArmor Policy
- The user needs to go to the cluster to apply the following KubeArmor Policy.
apiVersion: security.kubearmor.com/v1
kind: KubeArmorPolicy
metadata:
  name: harden-mysql-pkg-mngr-exec
  namespace: wordpress-mysql
spec:
  action: Block
  message: Alert! Execution of package management process inside container is denied
  process:
    matchPaths:
    - path: /usr/bin/apt
    - path: /usr/bin/apt-get
    - path: /bin/apt-get
    - path: /sbin/apk
    - path: /bin/apt
    - path: /usr/bin/dpkg
    - path: /bin/dpkg
  selector:
    matchLabels:
      app: mysql
  severity: 5
  tags:
  - NIST
  - NIST_800-53_CM-7(4)
  - SI-4
  - process
  - NIST_800-53_SI-4
Save the policy as a “.yaml” file.
- Applying the policy from the cluster:
kubectl apply -f mysql.yaml --kubeconfig dkp-eks-kubeconfig.conf
kubearmorpolicy.security.kubearmor.com/harden-mysql-pkg-mngr-exec created
- Violating the Policy
To violate the Above policy, users need to exec into the MySQL pod under the WordPress-MySQL namespace.
kubectl exec -it mysql-768cb6b7bd-txbvh -n wordpress-mysql --kubeconfig dkp-eks-kubeconfig.conf -- bash
root@mysql-768cb6b7bd-txbvh:/# apt-get
bash: /usr/bin/apt-get: Permission denied
- Policy logs
To see the Policy Log, the users must navigate to the Cluster CLI and give the following command, and then view the policy from the MySQL pod
karmor logs --kubeconfig dkp-eks-kubeconfig.conf
Sample Output:
karmor logs --kubeconfig dkp-eks-kubeconfig.conf
local port to be used for port forwarding kubearmor-relay-6b59fbf77f-f8g2m: 32859
Created a gRPC client (localhost:32859)
Checked the liveness of the gRPC server
Started to watch alerts
== Alert / 2024-04-05 17:11:16.812423 ==
ClusterName: default
HostName: ip-10-0-120-36.ec2.internal
NamespaceName: wordpress-mysql
PodName: mysql-768cb6b7bd-txbvh
Labels: app=mysql
ContainerName: mysql
ContainerID: 42b044cdd51b2e01f106a14fc6e06cf2d5d786fe1b24e3212e2425821f50111f
ContainerImage: docker.io/library/mysql:5.6@sha256:20575ecebe6216036d25dab5903808211f1e9ba63dc7825ac20cb975e34cfcae
Type: MatchedPolicy
PolicyName: harden-mysql-pkg-mngr-exec
Severity: 5
Message: Alert! Execution of package management process inside container is denied
Source: /bin/bash
Resource: /usr/bin/apt-get
Operation: Process
Action: Block
Data: lsm=SECURITY_BPRM_CHECK
Enforcer: BPFLSM
Result: Permission denied
ATags: [NIST NIST_800-53_CM-7(4) SI-4 process NIST_800-53_SI-4]
Cwd: /
HostPID: 21015
HostPPID: 20531
Owner: map[Name:mysql Namespace:wordpress-mysql Ref:Deployment]
PID: 167
PPID: 160
ParentProcessName: /bin/bash
ProcessName: /usr/bin/apt-get
Tags: NIST,NIST_800-53_CM-7(4),SI-4,process,NIST_800-53_SI-4
UID: 0
Note: Once KubeArmor is added to the DKP default application catalog, a user can directly enable it from the UI
Conclusion
Organizations that are very much in the cloud-native environment would consider securing deployments on Kubernetes a critical concern. KubeArmor, an open-source policy enforcement engine, and integration with the D2iQ Kubernetes Platform can help organizations proactively address runtime security risks and gain better control over the Kubernetes environment.
As discussed in the step-by-step instructions above, you can deploy KubeArmor within the DKP application catalog to integrate it with DKP-managed clusters.
This will help you define and apply granular security policies to limit the behavior of containers, trying to prevent potential threats while preserving industry standards and regulatory requirements. KubeArmor combines well with the strong management capabilities of the D2iQ Kubernetes Platform for a better security posture and minimizes the chances of a security breach for greater confidence in Kubernetes deployments. With operations in a highly regulated industry or adhering to best practices in runtime security, the integration of the two is a worthy solution for securing mission-critical applications and protecting sensitive data in the Kubernetes environment.
Get a LIVE Tour
Ready For A Personalized Security Assessment?
“Choosing AccuKnox was driven by opensource KubeArmor’s novel use of eBPF and LSM technologies, delivering runtime security”

Golan Ben-Oni
Chief Information Officer
“At Prudent, we advocate for a comprehensive end-to-end methodology in application and cloud security. AccuKnox excelled in all areas in our in depth evaluation.”

Manoj Kern
CIO
“Tible is committed to delivering comprehensive security, compliance, and governance for all of its stakeholders.”

Merijn Boom
Managing Director